At the start of this year, I was totally happy with the planner I was using. But then one day, some well-meaning friends bought me a really nice, deluxe notebook. First I thought, “Wow, it’s rare for people to be aware of what a high quality, modern notebook is. I’m impressed.” And my second thought was, “I want to use it for a Bullet Journal!”
So being the novelty addict that I am, I decided to put my current planner on pause and try Bullet Journaling again. I’ve Bullet Journaled off and on for a long time, but this time around I stumbled onto something amazing. In fact, once I finished that notebook, I could not wait to start another Bullet Journal. For me this is a big deal because normally with my Bullet Journals, I either abandon it before finishing the notebook, or when I do finish, I’m like, “Yeah, not doing that again for awhile.”
The way I Bullet Journal now is simple and not fussy. Plus, my current approach effectively answers a few common pain points of Bullet Journaling, those being:
- Cramped future planning.
- Difficulty handling re-occurring tasks.
- Having to buy three or four notebooks over the entire year.
- Spending a lot of time setting it up.
- Struggling to find relevant notes (this was a problem for me, at least.)
I think one of the reasons why I’ve kept falling in and out with Bullet Journaling is that sometimes I really need to future plan, and then at other times, I don’t need it as much. The way I set up my Bullet Journal now is a nice blending of the two.
I hope this Bullet Journal tour will give you some ideas on how to set up your own Bullet Journal so that you can effectively future plan while having plenty of room for notes. And you may even find yourself buying fewer notebooks because this method encourages better use of page space.
What Inspired Me
My favorite thing about Bullet Journaling is that it has allowed me to try on different planner layouts. Sometimes I’ll browse MochiThings for planner layouts that I love and then give them a spin in my Bullet Journal to see if they are a good fit for me.
The current layout of my Bullet Journal is heavily inspired by the popular zero-waste weekly planner created by Wisdom Supply Co. As a result, my Bullet Journal is delightfully effective and efficient.
I admit that in my five years of getting together with and breaking up with the Bullet journal, I have gone from being a fancy doodler to a minimalist. This set up that I’m sharing with you is minimalist. However, the Bullet Journal Method is a minimalist method at its core. It’s just that people have gotten so creative with it, that some of that has been lost.
Just to be clear, using your Bullet Journal as a place for art and doodling is fine, and as an artist myself, I get that. However, it’s important not to let the creativity get in the way of the main point of Bullet Journaling which is to have a notebook where you can plan, jot down some notes, and then find those notes effectively. Bullet Journals can become a source of frustration if you lose touch with the purpose of it.
But although I’m a minimalist, I think a maximalist Bullet Journaler would enjoy this set-up too because of how it handles the use of page space.
Here’s My Set-up:
(Tl;dr: You can watch short videos of this set-up via my Pinterest board under the section “Bullet Journal Hacks”. You can also find them on Tiktok @arcadiapage. I’ll be posting the videos over the next week.)
Rapid Logging
In the Bullet Journal system, rapid logging is the language of capturing information from the day, be it notes, tasks, or events. Just like with the standard method of Bullet Journaling, I use bullets for tasks and a dashes for notes. I also use nesting. That means if there is a main task with related tasks, I’ll write the main task first, and then list the subtasks under it using an indented style.
I deviate from the standard Bullet Journal method when it comes to events. Because of the layout I use, I don’t worry about marking events with a circle. I use regular bullets for tasks and events.
However, I do use special bullets for projects and repetitive tasks.
For projects, I draw a bullet with a square around it. Tasks that are vague, require multiple steps or take a lot of time are projects. “Write a book” or “Clean out the garage” are projects. Things like “Call mom” or “Sweep the floor” are tasks.
Drawing squares around project tasks helps me see at a glance what can be done quickly, and what will require some extra steps.
For re-occurring tasks, I draw a circle around the bullet. This lets me know that this task will need to be rewritten on my calendar once I complete it.
Signifiers
Over the years, I’ve found that it’s best to stick with familiar symbols for my signifiers. For example, I mark favorite notes and tasks with a star, just like how I star messages in my Gmail.
Here is a list of signifiers I use:
- Right arrow = Moved/migrated
- Exclamation point = Urgent
- Star = Favorite
- Written page number with square drawn around it = Page link/reference
At the start of my journal I have a key that lists the bullet styles and signifiers I use for easy reference.
Collections
What really makes this method special is how I use and organize my collections.
The Index is Now Favorites
Instead of counting off four pages at the start of my notebook to create the index, I dedicate the first two pages to note my favorite pages and collections.
To keep track of my favorite pages, I simply write the page topic and then the related page numbers.
One neat thing I’ve noticed is that once I started using a favorites page, memorizing the page numbers of collections that I refer to often became easier. I know that my book projects collection is on page 19, and my personal projects collection is on page 11… Being able to know key pages by memory is very efficient.
Future Log
After the favorites pages is my future log. It sticks to the standard format of The Bullet Journal Method. I divide my page into thirds and write the names of the upcoming months in each section. My future log covers six months, so I use two pages that are divided into thirds. When noting down an important future event, I like to put an exclamation mark in front of it.
Here is also where I start to number my pages. I tend to number my pages as I go, instead of doing the whole notebook at once.
4 Days Layout
This is where things start to get interesting. When I get to my first pair of blank double pages after the future log, this is what I do:
On the left hand page, I write the name of the month in the top left corner. Then I divide that page up into four equal horizontal sections. Each section represents a day of the week.
At the beginning of each section, I write the date followed by the day of the week.
Then on the right page, in the top right corner I write the name of the month + notes. For example, if it’s September, in the top right corner I write “September notes.”
So on one side of the spread I have a calendar, and on the other side I have notes.
I repeat this on the next set of pages, and on the set after that until I’ve created a calendar for the entire month.
This layout creates plenty of room for both planning and daily notes. If you flip through your notebook, notice how easy it is to find things. If you flip through your notebook going forwards, you see all your notes. If you flip through your notebook backwards, you see your calendar. That’s what I love about this!
On the four days side, I like to write my tasks for the day. The nice thing about putting my tasks on the four days side is that if I don’t finish everything I planned to do, it’s easy for me to roll over my tasks to tomorrow or later in the week by rewriting them. I can also get a nice overview of the past four days and see what I was able to finish and not finish. At the start of a new month, I always make sure to copy events and appointments from the future log to my four day pages.
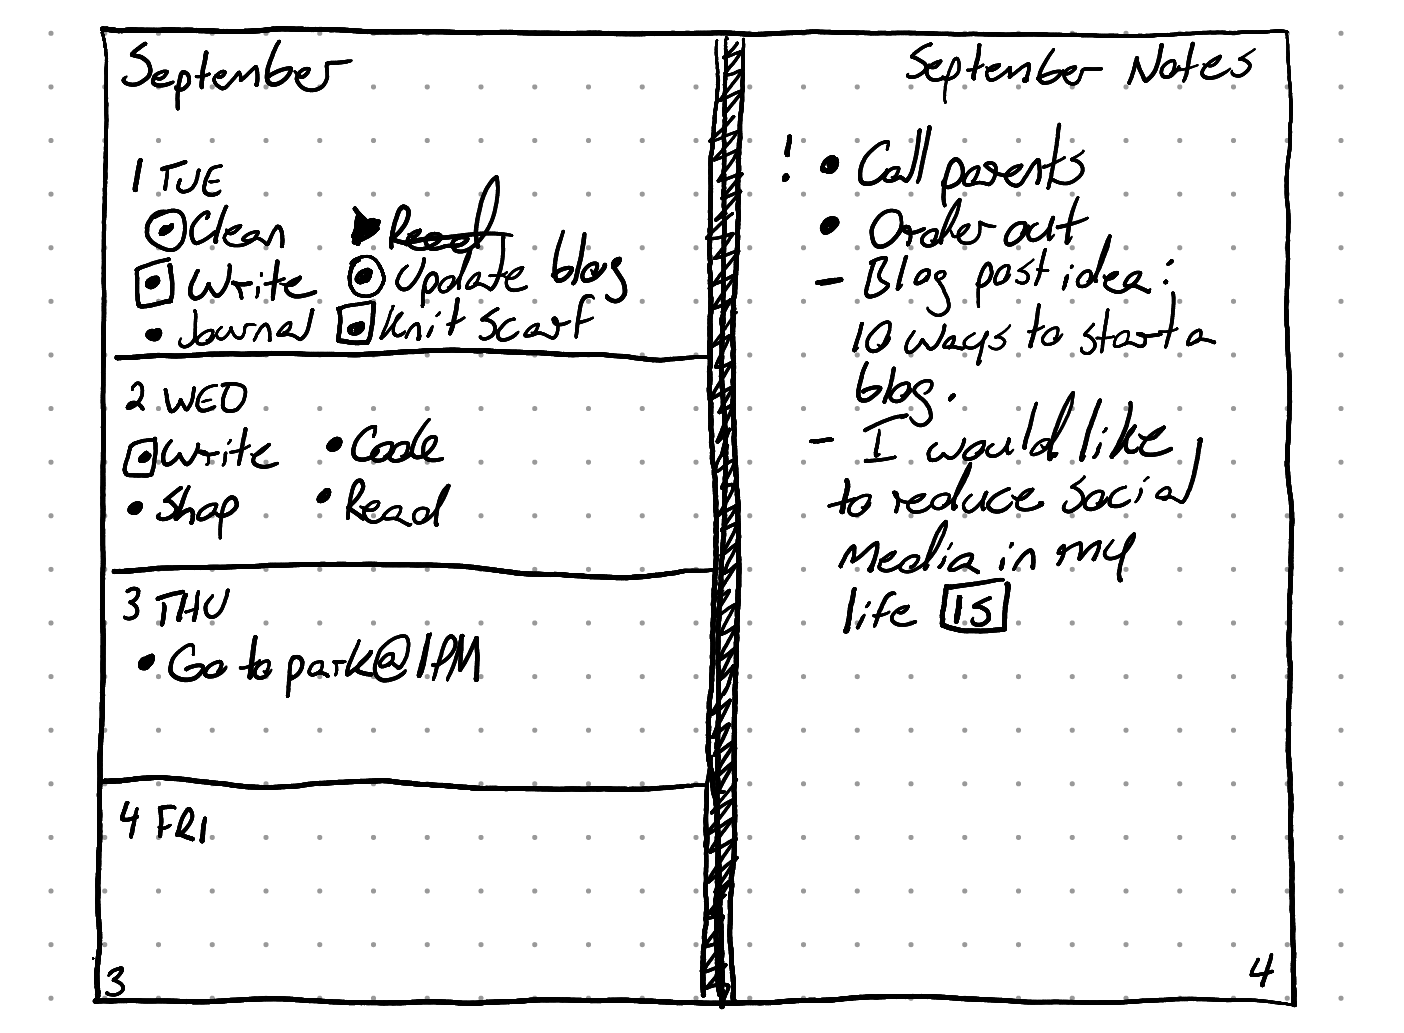
On the monthly notes side I like to start with reminders of important meetings and due dates that are coming up over the next four days. After that, it’s a little bit of everything! I write down tasks that I would like to do next. I also create short notes and journal entries. I star my favorite notes and entries.
If I want to expand on a note by creating a new collection, first I find a blank page at the end of my calendar for the month. Then on that page I write the title in the top outer corner to improve visibility.
After that I “link” the two notes together. At the end of the note on my monthly notes page, I write the page number of the collection and draw a square around it. Then on the collection page, after the topic name, I write the page number of the original note and draw a square around that.
If there isn’t enough room after the topic name to write the page link, I’ll write it next to the page number instead. Where I write my page links often comes down to what makes the most sense to me.
Other Collections
I put all of my other collections after my calendar for the month. My favorite collections are my Projects page and Wish-list/Someday page.
My Projects page really shows the power of linking pages to each other. It’s simply a list of projects I’m currently working on, but if I have more ideas for a project, I create a new collection for that project on a new page, and then reference the page where the new collection can be found on the Projects page.
Less Waste: Dealing with Empty Pages
It’s rare, but sometimes I have a monthly notes page with nothing on it. Since I know this happens, before using a fresh blank page at the end of my calendar spreads, I’ll go back through my notebook and look for other blank pages. If I find one, I write the topic of the collection under the Month notes title. Then I’m ready to go. Old and empty four day pages can be used for artwork, scribbling, and quick shopping lists.
This method has improved the usability of my notebooks. With past Bullet Journals I’ve only been able to fit about three months of information into a standard Bullet Journal sized notebook. However, with this method, I’ve been able to fit five months into one notebook.
Analog to Digital
After finishing a Bullet Journal, I like to type important notes into my digital notes system. As mentioned before, I mark my favorite notes with a star and important notes with an exclamation point. As a result, it’s very easy to see what is worth saving at a glance, and I don’t feel the pressure to save everything.
Give it a Try
I hope that this post has given you inspiration on how to make your Bullet Journal fast to set up, easy to scan visually and practical. Plus, you can still make a pretty if you want to!
I know there are a lot of technical things going on in this post. To make it easier to visualize, I’m doing a short series of Tiktok videos of my “Bullet Journal Hacks.” For easier viewing, I’m pinning these to a Pinterest board as I make them. Also a version of this post with more illustrations will be in my upcoming book.
12/4 UPDATE: This post and more is expanded on in my newest book, Thoughtful Planning: How I Learned to Use Journaling to Set Intentional Goals & Design Flexible Days.